


Quantum Fear-Mongering and The Infinite Perils Trap


Quantum is a real research problem, not a license to break Bitcoin’s deepest norms. Prepare seriously. Move slowly. Leave Satoshi’s coins alone.
In this article
As part of the journey of learning about Bitcoin, it’s typical that new and no-coiners start by buying Bitcoin but end up leaving it on the exchange or broker platform.
The next step is generally learning self-custody, which means withdrawing Bitcoin into a wallet where you hold the private keys. This is typically a phone wallet for small amounts or a hardware signing device (aka 'hardware wallet')…
But to further improve your Bitcoin self-sovereignty, it’s essential to learn to use Bitcoin with your Bitcoin node.
Think of it as a fake Bitcoin detector. A Bitcoin node validates Bitcoin blocks and transactions according to rules that define what Bitcoin is and how it exists.
It is also how you interact with the Bitcoin network, receiving and sending transactions. You either rely on somebody else’s node or use your own node to use Bitcoin.
You no longer have to trust that your service provider is telling you the truth about whether you received Bitcoin.
Your node is doing all of that validation instead. Your privacy will also be better when using your own Bitcoin node, as you are sharing less transactional data with third parties.
Some people shy away at this point, thinking that running a node is only for developers and highly tech-savvy enthusiasts.
And no, it’s not. Running a Bitcoin node is for everyone. There are lots of tools making it easy to do nowadays. The more people who take an active part in running and using their Bitcoin node, the better it is. Bitcoin is decentralized validation.
Instead of millions of users relying on one central service provider’s node, Bitcoin becomes more robust when more users are validating. Think of it as more participants keeping each other honest and having influence in the direction the protocol goes.
Below, I’ll spell out three relatively easy ways to run your Bitcoin node (Bitcoin Core) and connect your Bitcoin wallet with your Bitcoin node.
Merely running a Bitcoin node is of limited value. The real value comes when you use that node to validate your incoming transactions and broadcast your outgoing transactions. You can do this by connecting your software wallet with your Bitcoin node.
Specter Desktop is software you can conveniently install on the laptop or desktop computer you already use, and the convenient part is it comes bundled with Bitcoin Core.
It also works using your existing computer hardware, which costs you $0 additional outlay.
Let’s walk through some of the high-level steps.
Download and install Specter Desktop from specter.solutions.
Enable the in-built Bitcoin Core installation.
If you want to save hard drive space, download time, and set up time, you can also enable the 'QuickSync' feature. QuickSync will download a pruned blockchain snapshot to get started faster with some trust assumptions.
Wait until your computer has completed the initial sync. This will depend on your download speed and your computer’s processing power.
Add your hardware signing device, e.g. Coldcard.
Create a Wallet (single signature is OK to get started).
Use the 'Receive tab' to generate a Bitcoin address to receive coins. Or spend Bitcoin use the Send tab inside your chosen Wallet.
Every time you close and reopen Specter Desktop, you must wait for your Bitcoin node to re-sync up to the blockchain’s chain tip.
This is because the blockchain adds a new block every 10 minutes on average, and unless you leave your computer on all day, your node will fall out of sync while it is offline. Don’t worry; this is not something to worry about in this context.
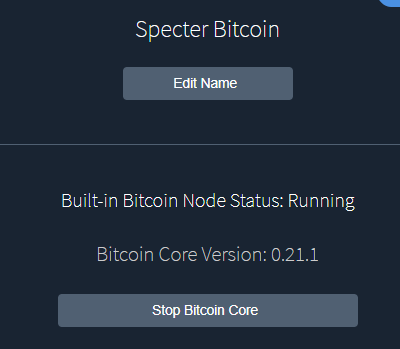
When your Specter in-built Bitcoin node is up and running correctly, it will look like this:
You can operate a Bitcoin node on an SBC (Single Board Computer) such as a Raspberry Pi or RockPro64. These are small devices that use less power and can be left on all the time cheaply.
Various software node packages will help make this process easy. Some vendors even sell a pre-built node device that makes it even easier.
Example: Umbrel, myNode, nodl, Ronin Dojo, RaspiBlitz, Start9 Embassy
Check out this node guide from Bitcoiner.Guide.
While this kind of setup will cost roughly $400 more than Method 1, the benefit is that your device will be on all the time, staying in sync with the Bitcoin network.
You will also benefit from viewing your transactions in your own mempool explorer, using Lightning, Coinjoin and privacy features, running self-sovereign Bitcoin payment processing, etc.
With this method, you will either buy the device outright or build it yourself and flash a microSD card with the Bitcoin node software.
If you buy the device outright, it will be a simple process of plugging it in to power and your router for the internet.
Then, you can access the node from your laptop or desktop (or even your phone in some cases), and you can connect your desktop/laptop software wallet to your Bitcoin node.
Example: You can download and install Sparrow Wallet on your laptop, and in the setup connection dialog box, you can copy-paste the information relating to your Bitcoin node.
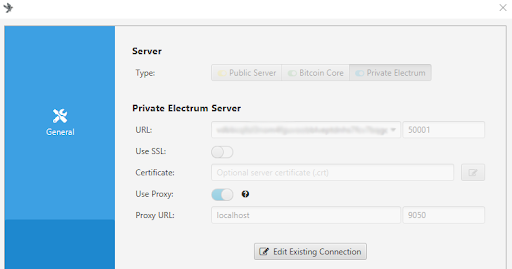
In Sparrow Wallet on Windows, click ‘File’, ‘Preferences’, then ‘Server.’
You can then paste in your Private Electrum Server address and port (e.g. 50001), which you should be able to find in your SBC node web interface.
Example: On Umbrel you will find this Tor URL in the ‘Connect Wallet’ dialog box area.
Once you’ve done this and clicked ‘test connection’, you can see if Sparrow is able to successfully connect to your own Bitcoin node for transacting. After you create or load up a wallet, you will then be checking your transaction history on your own Bitcoin node, rather than your service provider’s node.
When transacting, your Bitcoin node will be the one to broadcast the transactions. backs your software wallet such as Sparrow. With Sparrow Wallet, you can easily plug in your hardware signing devices (aka hardware wallets) directly via cable, or use air-gapped wallets via QR code or microSD.
So similar to above, you will have achieved the goal of transacting using your own hardware signing device, backed by your own Bitcoin node.
This option is not for everybody, but it can be the right choice depending on what you want to achieve.
In this case, it works well for people living nomadically or those who want to quickly set up an always online Bitcoin payment processor such as BTCPay Server.
You can use services such as Voltage.cloud or LunaNode to host your Bitcoin, Lightning or BTCPay Server node.
Using this setup, you are using someone else’s computer, so note there is a sovereignty trade-off.
However, it does make it easy to get started using a node that you control, rather than being entirely dependent on somebody else for Bitcoin payment processing services.
Example: If you are a merchant and want to set up to take payment without trusting somebody else.
BTC Sessions walks through a quick example of using Voltage to spin up a BTCPay node and accept payment over Lightning. You can create a webshop or set up to take bitcoin donations using the crowdfunding app.
Another example feature when selling services for Bitcoin is BTCPay Server’s payment requests.
Example: You might want to bill somebody $1,000 equivalent in Bitcoin, but they might be in a different time zone to you.
You can create a payment request on your BTCPay Server, a persistent web link that you can send to your customer. When your customer is ready, they can go to the site, and it will automatically do the USD to BTC conversion on the spot and show the correct amount of satoshis to pay.
Once paid, it goes into the wallet you specified, and this is all backed by the node you control. Easy!
Stephan hosted a panel with Swan CTO Yan Pritzker and Bitcoin Educator Anil Patel at Pacific Bitcoin Festival 2023. They share and discuss elegant graphical slides to help explain the many facets of Bitcoin using simple language and accessible analogies. Great to share with beginners!
Interested in setting up a Lightning Node, but you have a ton of questions!
How many channels do I need?
Who can I set up channels with?
How do I back up and manage my private keys?
How can I check on the status of my node?
Do I need to be a command line wizard?
The video below from Lightning Labs walks through the basics of Lightning Node management and node management tools.
None of this is so tricky that a motivated individual can’t figure it out. Once you achieve some of these steps, you will be amazed at the self-sovereignty you can achieve with Bitcoin if you take the time to learn.
Other aspects of learning include:
Verifying signatures.
Building from software from source.
Manually controlling or configuring elements of your node.
You can also learn about customizing your Bitcoin node with command-line operations…
Example: See the node box video guide series by k3tan here.
Bitcoin is about using tools to give yourself financial freedom, regardless of what other governments, businesses, or individuals say.
Using your own Bitcoin node on your existing PC, a dedicated node computer, or a VPS gives you additional functionality. It reduces the trust you have to place in other people or companies.
Whether you want assistance setting up your own Bitcoin node, buying Bitcoin, or about how to open the ultimate asset for your retirement portfolio, a Bitcoin IRA — Swan is here for you.
Learn more on the Swan Signal blog and Swan Media YouTube channel.
For more information, please visit swan.com.
Hold your IRA with the most trusted name in Bitcoin.
In this article
News
More NewsThoughts on Bitcoin from the Swan team and friends.
Quantum is a real research problem, not a license to break Bitcoin’s deepest norms. Prepare seriously. Move slowly. Leave Satoshi’s coins alone.
A spot Bitcoin ETF tracks the price of Bitcoin. Owning shares is not the same as owning Bitcoin.
Live video verification, Jade Plus signing devices, and a purpose-built recovery assistant give families and businesses greater control over their Bitcoin.